CASE STUDY | TADAO ANDO – PART II | PULITZER FOUNDATION FOR THE ARTS

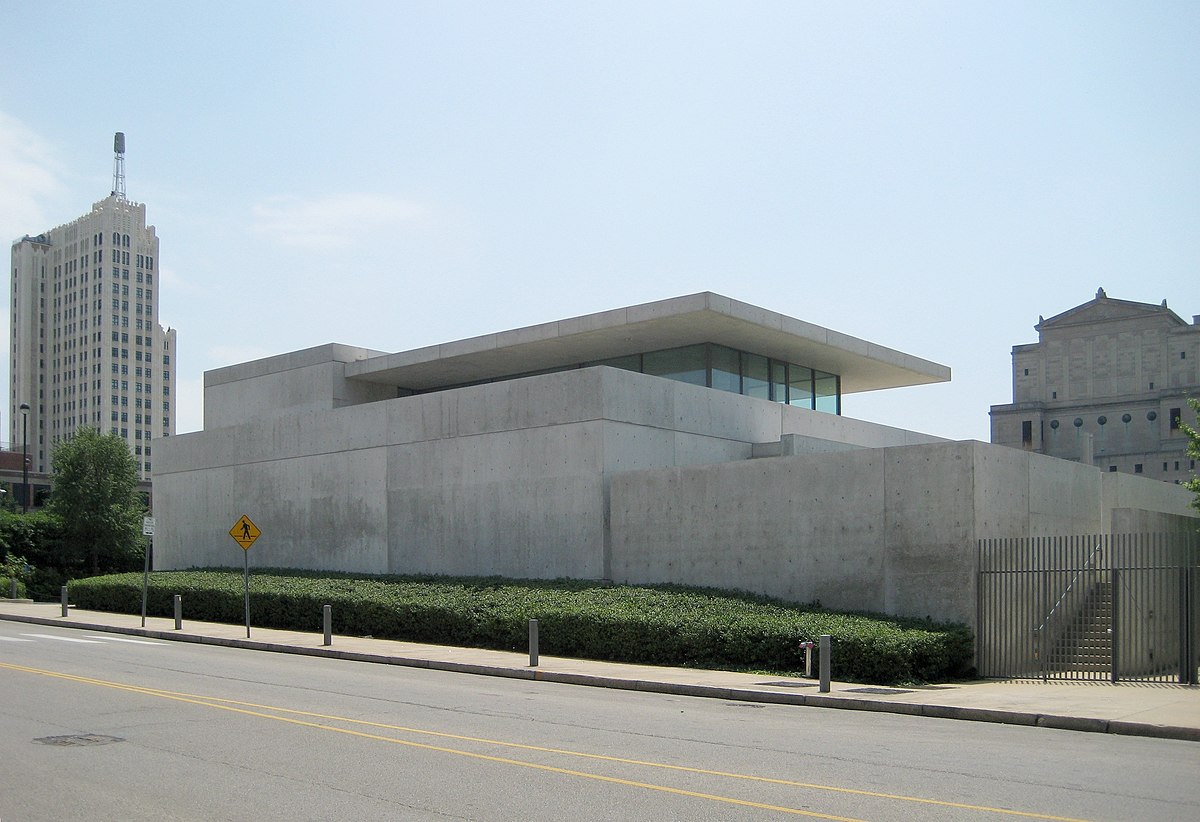
In the study of The Church of the Light, I described Ando as “seeking minimalist perfection”. Whilst readily apparent in the religious building, it is perhaps no more noticeable than in the Pulitzer Arts Foundtion (formerly the Pulitzer Foundation for the Arts) – an art museum he designed in 1991 (before later expanding from 1995-1997, before fully finishing in 2001) in Saint Louis, Missouri. First intended as a renovation of a derelict car factory in an a run-down area of Saint Louis as part of an urban regeneration scheme, after choosing Ando the site was relocated. Ando’s first free-standing public building in the United States, the design is simple even by his minimalist standards – composed of two perpendicular cuboids 7.3 metres wide and of slightly differing lengths – 62.2 metres and 65.9 metres respectively.

Here, the floating quality of the concrete roof is apparent, as are the exterior walls. Entrance is provided through a narrow, almost claustrophobically so,  passage to the right of the top of the steps. 

What is particularly notable is the austerity of its design – by Ando’s own admission, it is in essence “an uncompromising box”. The two sharp concrete volumes – featuring characteristic rod holes in the concrete that has become typical of Ando – are offset by the pristine horizontal roof which appears to almost hover on a deeply inset glass cube. The large expanses of glass, not readily apparent from the street-level view, flood the interior with natural light, whilst a central water court provides a soothing counter to the otherwise solemn nature of the museum. Despite the abundance of natural light within, however, it is still strictly controlled to prevent damage to the artworks – with the positioning of the glazing carefully considered. This also allowed Ando to display once more his mastery of light and shadow, with sharp areas of light offset by deep, dark shadows in striking arrays. In the exterior, a series of long walls limit views of nearby buildings and keep visitors eyes contained to the site, whilst simultaneously guiding the circulation to and from the entrance.

The central water court

It is perhaps the most ‘brutal’ of Ando’s buildings, the almost slab-like forms of the concrete volumes possessing an imposingly monolithic quality to them. It is certainly not a building which invites people in, but instead showcases Ando’s ‘less is more’ philosophy in its purest form. The solemnity of the design keeps the focus on the artworks within – which includes works by Monet, Picasso, Richard Serra and Elsworth Kelly – existing as a contemplative container for the work.

Along with the Church of the Light, the Pulitzer had the profoundest effect on the overall architectural design of the honours project building, showcasing the power of minimalism and concrete its material facilitator.


CASE STUDY | TADAO ANDO – PART I | CHURCH OF THE LIGHT

To start off the case studies, I’ll be looking into the work of the renowned self-taught Japanese architect, Tadao Ando. The only architect to have won the field’s four most prestigious awards – the Pritzker, Kyoto, Praemium Imperiale and Carlsberg Prizes – his work spans the mid-70s to the present day, with a particular focus on materiality, light and shadow, and a keen appreciation of the natural environment.

Whilst Ando could not be called a true Brutalist, he is noted for his heavy use of concrete (particularly exposed concrete) in his work, and the particular attention he pays to its material and monumental qualities. He has been particularly influenced by Le Corbusier – arguably the godfather of the Brutalist movement – citing his “Dom-ino” houses as particularly inspiring. These houses were created in line with Corbusier’s ‘machine for living’ philosophy, designed to be assembled from a series of basic components like a ‘kit’. “Designed without supporting walls”, in Ando’s eyes “they completely liberated the expression of modern architecture”. 1

The Pulitzer Arts Foundation building (2001), designed by Tadao Ando

I would describe Ando as borrowing Brutalist aesthetics, but not so much the philosophy – his is entirely his own, and often at odds with those of the true Brutalists. His work, whilst often monumental, lacks the brashness common to much of the movement – if anything, his carefully precise designs are delicate in their aesthetic sensibilities. I’d go as far as to say that much of his architecture is actually polite, in a  soothing kind of way. His clean geometry seems to be a means of seeking minimalist perfection, to create a “unified transcendent architecture”2. Whilst he may not be a true Brutalist, his architecture does speak with a similar visual vocabulary, and indeed evokes similar feelings in me as more obviously Brutalist works do.

As an architect with over 65 works to his name, there are simply too many buildings to examine in detail. The case study will instead focus on a select number of works of particular interest to me. In this case, this usually means they are either:

a) The most appropriate in either setting, use (as in house, church, museum etc) size or material,

b) His most famous works, or more commonly,

c) Ones that I just really like.

As reasons go, I know there are far more academic and carefully considered ones out there, but with this, I want to see what I like and learn from the work why this is, and not purposefully pick apart something I already dislike. Such an exercise can be very useful, of course, even if only to learn what not to do and what to avoid, but is not really the purpose of this case study.

THE CHURCH OF THE LIGHT

Happily, the first building that I will examine firmly belongs in both b) and c), whilst also picking up a few points in a). The Church of the Light, built for the Ibaraki Kasugaoka Church in Osaka, Japan in 1999, is one of Ando’s most instantly recognisable works. With a floor area of just 113m2 , the church exists effectively as just a simple concrete box diagonally intersected by a long free-standing, punctuating the space and providing the means of access into the space through a well-placed opening. By far the most noticeable feature however is the stunning cruciform-shaped opening at the back of the church, fully quartering the back wall. Ando originally wanted this opening to remain glazing-free, but was denied due to the obvious issues it would cause in the colds of winter. Whilst he may not have got his wish for a breeze-filled space, the detail still lets the light flow through dramatically into the church, and on a bright day, the cross positively glows. As pretty much the only real source of natural light, the unusual opening allows for at times both subtle and dramatic plays of light and shadow and can be markedly different depending on the time of day and weather conditions. Whilst it is impossible to truly tell what it’s like to be there without having visited (which I haven’t – one for the architectural bucket list), it is not hard to imagine it as a serenely meditative experience to explore the space.

The building’s carefully considered materials are key to the success of the light-play and its transcendental qualities. The most obvious is the exposed concrete walls and ceiling, smooth, yet with a notable patina of ageing and featuring the precisely spaced tie rod holes that are so characteristic of Ando’s work. The panel grooves align perfectly with the horizontal of the cruciform; just another signifier of Ando’s acute attention to detail. The concrete considerably darkens the space in combination with the blackened cedar flooring (re-purposed from scaffolding planks in symbolically ascetic fashion – they were also used for the benches), increasing the impact of the natural light. This allows one to focus on the play of light in the space, exposing the subtle variations of the concrete. Contrasts, or rather, duality is profoundly important to the building. Light and dark, void and solid, loud and quiet. Going from a typical Japanese suburban area into a profoundly empty, serenely quiet space of darkness punctuated by shafts of light would be a powerful experience.

SEMESTER TWO | INTRODUCTION

So, semester two of fourth year. My final semester after a combined 8 years of uni. Exciting (and more than a touch intimidating) stuff. #

I was very pleased with how I did with my honours project grade for last semester – I had worried that the lack of practical work and focus on more academic/text-based research might not go down so well, but thankfully my fears were unfounded. The feedback was in general excellent, with one notable caveat – the project scope.

I had thought last term that a 1-2 minute rendered short film was not a massive ask, but towards the end of term when I began breaking down the tasks required to do it properly – with a carefully considered and cinematically informed approach – thoughts began to creep in that this may be too much work. Much of the work I’m having to do involves many separate disciplines – such as storyboarding, production and architectural design, video editing etc – and I am inexperienced in several of them. Gordon rightly pointed out in my proposal feedback that it will be “easy to get lost in the details” – with so many disciplines involved this is a real possibility and something I will have to be mindful of going forward.

However, having drawn up a schedule at the end of the term I am confident that the project proposal is achievable. That being said, I am actively looking for ways in which to narrow the scope – the timetable assumes that I’ll be working heavily every single week from week 1 right up until submission, and frankly knowing myself, I doubt this will happen in reality. One simple way to do this would be to simply reduce the length of the film, perhaps to within 30-45 seconds minimum. I do think this would be a touch short though (though kooola’s Unreal Engine 4 videos were of similar length and still had great impact).

Another possibility to save time would be to simply use existing music instead of creating my own. Frankly, what with the already large workload I was doubtful from the start that I would have time to do this, and that I am utterly inexperienced in composing even simple music does not help. The project, however, is not about music – whilst it would be nice to have, by no means is it completely necessary.

The first tasks on the project schedule are storyboarding (I process I expect to take many weeks and involve much iteration) and case studies. Whilst the schedule states that the first will be Tadao Ando, in reality there will be two during this phase – The Third and the Seventh will also be included. Render tests on lighting and materials will also be carrying on from my initial experiments at the end of last semester.

So, yes, stage one:

  • Tadao Ando + The Third and the Seventh case studies
  • Storyboarding
  • Render/lighting tests

PRACTICAL RESEARCH | RETURN OF THE CIBI

It’s back!

The newly rendered Cibi glass.

I always thought it was a bit weird how despite the high level of detail in the model and the material seeming ok the renders of the Cibi glass – which I modelled early on in the semester – didn’t turn out nearly as nice as I expected. So, what with having a new set-up for material testing – courtesy of Bertrand Benoit’s free scene – I decided to have a quick try at re-rendering it. Turns out it must’ve been my studio/lighting set-up and render settings that were messing with it before, as it came out a lot nicer this time! I might even be able to use it as a prop in the film, if it fits.

I think the refraction is possibly a touch too strong and I didn’t have the time to try it out with dispersion turned on (this can quadruple the render time, and that’s if you’re lucky), but I’m still pretty happy with the result. It looks pretty like the actual glass now.

Doing these material tests has really hit home the value of using depth of field in the camera – for such a subtle effect it adds a lot to the photorealistic quality of a render.


PRACTICAL RESEARCH | MATERIAL TESTS

Material Testing – Sheet 1: Showing images of the various iterations on the first material and short notes on process
Material Testing – Sheet 2: Expanding on the general process and experimentation to create the aged sandy concrete material
Material Testing – Sheet 3: Streaked grey concrete material and the process used

So far the project has been heavy on visual and academic research, but less so on practical research. Whilst this will be far more of a focus as I get into production tasks next semester, I’ve already started experimenting with material creation as an element of practical research.

This will be of great use not just in assuring the practical success of the final outcome, but also in locking down the types of materials I plan to incorporate and giving me materials to use quickly on the block-out to get a more realistic idea of how lighting will behave in the spaces I use.

As brutalist architecture is the focus, concrete was naturally the immediate material to explore. I won’t talk much about it here, as I’ve included some experimentation ‘sheets’ that include test renders of my material experimentation. As I’m aiming for a high degree of photorealism, these took quite some time in creating, even in this rough test form.

I used Bertrand Benoit’s material testing scene (available here) as a starter, then replaced his “BBB3” label geometry with my own SM/ART tag (Stuart McInnes art – a happy coincidence that combo was, indeed). Naturally, I didn’t model the sphere or the pedestal then, but I scarcely saw the point in remodelling something so simple when the point of the exercise was to test materials.

The scene is over 5 years old, and was created on Max 2010, with a VRayPhysicalCamera. These are deprecated nowadays as the standard Max Physical Camera has the same features as the VRay one now as thus is pretty obsolete – this caused some conflicts. I was able to create a camera with the same settings in the same place though and it worked just as well – I just had to adjust the white balance to be a touch warmer to compensate for the changes (6.5k temp to 7k), as even with 7k temp lights it appeared a touch too cold and clinical before.


RESEARCH | THE SHOT LIST

Carrying on from the research notes post on storyboarding, I’ve separated the section on the different types of commonly used camera shot in films into its own post here. Will include as many links to examples of these shots in use.

The Shot List

Visually specific shot list needs to include:

  • Scale

    • “relationship of frame to object it presents”
    • Eg. if frame crops human just below shoulders = close-up
    • If frame allows viewer to see whole village = wide shot
  • Angle

    • Camera position to object(s) it’s focusing on
    • Height as well as horizontal placement
  • Camera Movement

    • Right/left direction taken from p.o.v. of cameraman
  • Blocking (of characters, vehicles etc) – for me this might be moving/animated elements. Maybe windows/shutters opening, letting in light?

    • Shows movement (arrows or whatever works) of characters and moving elements within frame
  • Script notations

    • In case of actual scripts, storyboard might include excerpt of what is being said/done on script during the frame

Scale

Angle

  • High-angle
    • Self-explanatory, but here we go: shot taken from above the object, looking down
    • Example: Many to choose from – went with the beginning of this scene from The Avengers (2012). The camera looking down at them emphasises their upward gaze towards the portal in the sky.
  • Aerial shot
    • Very high angle – ‘bird’s eye view’, or just from very high up overlooking area. Often achieved with drones nowadays.
    • Example: Very commonly used to show an ‘epic’ landscape, and so is used a lot in films, and especially those set in expansive natural environments. The Lord of the Rings trilogy is notable for using them as an extended tourism for New Zealand. One example of the many aerial shots is that showing the city of Edoras in The Two Towers
  • Low angle
  • High hat shot
  • 3/4 Shot
  • Profile
    • Shot from side angle – a bit like a side-on elevation in architectural drawings
  • Straight-on/frontal
    • Camera looking directly at object
  • Over the Shoulder Shot (O.T.S.)
  • Canted Frame
    • ‘Dutch’ or ‘Chinese’ angles – tilted sideways off the vertical axis, so that the view appears ‘slanted’. Danny Boyle is a big fan of these in Slumdog Millionaire (2009).
    • Example: Slumdog Millionaire – throughout really, though particularly in this train sequence.


Camera Moves

Will look to find examples of these, and include youtube/vimeo/whatever links if possible.

  • Dolly shot

    • “Tracking”/”Trucking” shot
    • Camera travels on dolly tracks – smooth movement, usually on z-axis (zoom in/out)
  • Pan

    • Swivels on horizontal (x) axis – often to follow the action through the scene
  • Swish Pan

    • A variety of frying pan designed by famous Scottish actor and former James Bond Sean Connery during a period of self-discovery in Switzerland.
    • Also, a very swift panning camera movement that blurs the scene inbetween the start and end points.
  • Tracking Shot

    • Camera moves to left or right, up or down, following a particular figure, object, vehicle etc
    • Often used in a single-take manner, and something of a darling of recent TV series in action heavy scenes. Game of Thrones, True Detective, The Walking Dead all have used these in single-takes.
    • Example: The utterly sublime almost seven minute housing project raid scene from the first season of True Detective
  • Tilt

    • Camera pivots up and down from it’s base, which does not move
    • If tilting up, can illustrate height/character looking up (like at a tall person or skyscraper etc)
    • If tilting down, can illustrate small stature or something on the ground (probably used in The Borrowers a lot, but can’t think exactly when…), or transition to a previously unseen element below the camera
    • Example: Pretty much every opening scene to the Star Wars films – here’s the one from A New Hope. Camera tilts down from the blackness of space down to reveal a planet. Classic combo for Star Wars.
  • Boom shot

    • Cam travels up and down on a boom arm
    • Often combined with dolly move
  • Crane Shot

    • Taken from a crane
    • Has ability to boom down and track in long distances without using tracks
  • Car Mount

    • Camera mounted on vehicle
  • Static shot

  • Steadicam shot

  • Zoom

    • Movement of zoom lens. Usually used in video.
    • Example (zoom out): Opening scene to Dirty Harry (1971) where the camera zooms out to show the location of the sniper relative to the target
  • Zolly

    • Camera dollies in and zooms out at same time – disorientating effect
    • Often used when character has moment of terrible realisation
    • Hitchcock (Vertigo), Spielberg (Jaws), Scorsese (Goodfellas)
    • Example: “Get out of the water!” scene from Jaws (1975)
  • Smash Zoom

    • Very fast zoom
  • Handheld/shaky cam

  • Follow shot

  • Travelling Shot

    • Any shot that utilises a moving camera body

PROJECT | SEMESTER TWO SCHEDULE

Project schedule for semester two.

As discussed in previous posts, I very much needed to make a clear schedule for the project tasks from the start of semester two right up until the deadlines. Defining the key project pipelines for preproduction, production, and postproduction helped much in this regard. I drew on my existing experience in arch viz in defining realistic timeframes for the production tasks – the allocated time for them is, however, generous compared to a standard arch viz studio. This is deliberate as it’s always best to plan for things taking much longer than you expect.

Obviously the schedule will not end up being perfectly adhered to, but it will be nonetheless be highly useful in structuring my work for the next semester and be a good way of charting my progression through the project.

RESEARCH | POST-PRODUCTION PIPELINE IDEAS

Despite saying I wouldn’t get into the postproduction pipeline until next semester, I do need to have a clear schedule for semester 2 – the complexity of this project necessitates this to the highest degree. Whilst I might not make a clear pipeline as I did for the production/preproduction one in the last post, I will at least define the key tasks so I can adequately schedule.

So, I did some more digging – as ever, Stephan Bugaj had the clearest diagram to work off of, but I did ‘shop around’ first. All the others were saying the same for post-production pipelines, just not as clearly and concisely.

Bugaj’s postproduction pipeline for film, roughly annotated/edited by me.

Breakdown of some key points:

  • Acquisition – this refers to getting your film “in the system” – for myself this would effectively be importing the clips into the editing software effectively, hence me changing it to Importing
  • Compositing – added between Importing and Editing (picture) – the process of combining the different render layers together. V-Ray can render out various different layers for postproduction purposes – this is when I would combine the relevant ones I want.
  • Scoring – removed as whilst I will be creating music (I think) I will effectively be doing this along with the sound design/fx section.
  • VFX/VFX Editing – as I’ve stated a few times, I’m not yet sure as to whether VFX will be included. If it is, where it fits here in the pipeline is correct – so I’ll leave it in for just now.
  • Picture lock – when the editing for the picture and sound is finalised, and can then get into mixing and colour grading
  • Colour grading – colour and tone adjustments. Can completely change the tone of the film so crucial step. Used to doing this with individual images in Photoshop – After Effects will act as the film equivalent of this for my project.
  • Sound/music/final sound mix – Adjusting of the audio levels for the sound and music so they fit the tone of the film – the music might be edited perfectly but be overbearingly loud. Conversely, the sound effects might be far too quiet to hear. This is when these will be adjusted to appropriate levels.
  • Export final film – ie. when all is finito and I’m happy (or as happy as I’m likely to be) with the entire film. Hit export, make sure the export settings are correct, then check there’s no issues from the export. If not, then all done. God, it’s weird even typing about it when I haven’t begun even building the scenes yet!

This roughly edited pipeline will be used for scheduling purposes when I create the Gantt chart.

RESEARCH | WORKING PIPELINE

Following on from the research into potential pipelines and examination of my current workflow, I went away and came away with this working pipeline, shown below. By ‘working’ I mean it in the sense that it is a work-in-progress – it will be modified as necessary. However, I believe it is a solid process and covers all the key areas I need to consider in making a cinematically-informed arch viz short film, production-wise.

The working pipeline.

Breakdown:

  • Pipeline is divided into three key sections: Preproduction, production and ‘both‘ – both in this case denoting tasks that will straddle both the production and preproduction phases of the project.
  • Visual research and the case studies/academic research will effectively tie into all areas of the project naturally – the arrows I used however are for where they are most relevant. Visual research for example leads to story/concept, mind-mapping and the main preproduction box, as these are the areas it informs the most.
  • Render tests are a task that is classed as ‘both’ as these will begin in preproduction (they are ongoing just now) but will carry on all the way through the production phase. They will be useful for storyboarding and previs purposes, as well as the production design phase.
  • Speaking of which, production design here means the process of designing the space/building that the film will take place in, as well as the surrounding landscape. This will be partially done through the modelling stage itself, but I need a good idea of the space if I’m to effectively storyboard.
  • Throughout the diagram, especially within the main preproduction and production boxes, the connecting arrows form a cycle – this is to represent that this is an iterative process. Revising each of these will affect the others – the order they’re in is merely the general order in which they will be started, not finished.
  • Shot list revisions, storyboards and production design are included as ‘both’ despite being mainly preproduction tasks as they will still be worked on during production. Final Shot list revisions will take place before getting into the shot layout step, for example.
  • Shot layout – synonymous with the ‘layout’ process of 3D animation: will set up the cameras and camera paths and the shots that will be used.
  • Layout revision – same as above, but will be refining these throughout the production process naturally
  • Arch viz techniques: research – basically just looking at the techniques used by other arch viz artists and the industry that will be useful for the production of the project. Smaller studies of existing arch viz films will help inform the shot layout for example.
  • Modelling is broken down into block-out, refinement and props. Refinement should be obvious enough, but props doesn’t just refer to modelling props – like in films, I won’t be creating all of my props from scratch, some will be sourced. Props then refers to modelling, sourcing and placing the props in the scenes – effectively the arch viz equivalent of set dressing.
  • Block-out leads to shot layout, as the block-out should be sufficient for setting up the general camera shots and paths. It won’t be until the refinement is completed however that I get into the nitty gritty of materials, lighting and rendering however.
  • Post-production doesn’t have a firm pipeline as of yet – I’ll define this clearer. I know the key tasks involved though, namely:
    • Editing – a biggie, and very important to the overall feel and success of the film
    • Sound – planning to go for mainly diegetic sounds, with the non-diegetic (music) being unobtrusive. Whilst I adore music and am an amateur musician (in that I play an instrument – violin), I have little to no experience of actually creating original music. I’m going for a lonely tone, so music would be subtle anyway. Case studies will help inform this.
    • Colour grading – will also be very important to the look
    • VFX – if used at all will be very limited, I’m thinking at most weather effects like dust. Possibly particle effects too – I know this can be done quite effectively within After Effects.

RESEARCH | PIPELINES

Establishing an efficient and effective pipeline is essential to the success of any creative project, but arguably even more so for this one due to the large number of constituent parts and ambitious scope of the project. I don’t want to waste time on unessential elements, or equally by neglecting important elements and having to go back and do them.

I’ll keep the text brief and the post informal, this will read mostly like notes.

My Current 2D Visualisation Pipeline

This is the basic pipeline that I use when creating standard 2D visualisations and 360° visualisations. I arrived at this/was taught this during my various internships I’ve undertaken, and has been refined by working on my own personal pieces.

The 2D Arch Viz workflow/pipeline that I use. Camera, lighting, materials, rendering section is very iterative, hence the arrows leading back and forth from each section. Visual research feeds into every section, but especially the concept, lighting and materials.
  • Brief/Concept/Purpose: always starts with this – why am I creating this piece/doing this project? I set clear goals for what I want to achieve, and this will inform the entire project.
  • Visual Research/Reference gathering: This feeds into the project all the way through, especially at the materials and lighting stages, but is also essential prior to starting work.
  • Modelling: Block-out. Pretty self-explanatory – I start modelling and block out the main spaces, walls etc.
  • Modelling: Refinement – I refine the block-out so all the main ‘architecture’ is suitably detailed.
  • Populating/props – I populate the scene with furniture, props, people and vehicles(if necessary), plants, trees etc. Usually due to the fast-paced nature of the industry, these will be sourced from model packs, but if a personal project or I need a bespoke object, I’ll model these at this stage.
  • Camera set-up: Critical before testing lighting, I set up the camera(s) and angles.
  • Lighting: Once the modelling stage is done I’ll work on the lighting. Once lighting is at a stage I like I’ll add light-fittings in the appropriate areas. This is also where I’ll play with HDRIs.
  • Materials: I create and apply the scene’s materials. I constantly test-render at this stage to see how they appear in scene. Proper lighting is critical to get an accurate feel of how they will appear in the final renders, which is why it happens before materials.
  • Rendering: I test-render constantly to check the lighting, materials and camera are good. Once I’m happy these are all good, I begin doing finalised test renders and sort issues before doing a final render.
  • Post-production: I generally like to get as good a render as I possibly can within V-Ray, but I still do a decent amount of post-production on the image(s) in Photoshop to get them looking as good as possible.

This workflow works well for me and is also the general industry standard for 2D Arch Viz.

Film Pipelines: Preproduction

Obviously though, the focus of this project is on a CG short film, not a 2D visualisation (though I will also use those – mostly as touched-up screencaps from the final film). The workflow and pipeline will as a result, be much more involved.

I’ve dug into research through books and online articles on film pipelines. As this is CG and involves no actors, the pipeline for 3D animation is closest to what I’m doing (though there is much to learn from general film pipelines too). There were a number of useful pipeline diagrams I discovered which were useful but didn’t entirely fit – I annotated/edited one of these below.

Live action film preproduction pipeline by Stephan Vladimir Bugaj (worked on a variety of live action/3D animation/video game writing productions), annotated and edited by myself.
  • Largely I feel this edited version is a pretty solid pre-production pipeline and reflects my workflow so far on pre-production, though I’m not as far as proper storyboards and production design.
  • It omitted visual research as a distinct step, which has been a hugely important part of my project so far, so I added it in, though in Bugaj’s notes on “production design” he included visual research as part of this.
  • As this is for live-action and obviously is not for an individual project, much was irrelevant. Casting, financial sections, hiring crew etc have no relevance to my project.
  • Previsualisation is effectively like 3D storyboards – this would be a good step for me due to the focus on architecture and spatial qualities rather than characters.
  • Other edited parts:
    • He defined the script breakdown as consisting of breaking the script down into a shot-list. From my research into storyboarding, this is essential before getting into this aspect, so I clarified this better.
    • Camera tests was expanded to include Render tests on materials and lighting as I’ll be using these to inform storyboards and the style I’m going for.
    • ‘Script’ is not a script per se for me, but rather story-beats and concept. The architecture is the ‘character’ – the script is more about how I want it to ‘speak’ during each scene and will develop along with the production design process.
Three stages of the Dreamworks animation general pipeline.
  • Layout is defined as setting up the camera angles and shots – this would in reality for my project be happening in the previsualisation
  • Numerous areas are irrelevant of course, such as rigging (it would just be modelling), casting, voice acting, distribution, translation/adjustment, dubbing/subtitling, and obviously, character animation.
  • Surfaces I’m taking to mean texturing/materials.
  • Effects is a difficult one…I’m toying with the possibility of including some particle effects or weather/dust clouds etc, so I’d say that definitely would come under effects. Can’t say with certainty right now if that will actually make it in though and may just be done in post-production anyhow.
  • The preproduction workflow is basically just a simplified version of the more complex one by Bugaj.

Film Pipelines: Production

So, back to Stephan Bugaj! Let’s see what he’s done for the production stage of the pipeline…

Live -action Film Production pipeline, part 1: Before shooting.
  • As usual, multiple areas that don’t apply, namely anything to do with actors or legal/financial concerns
  • Elements from pre-production still carrying in to the production schedule, namely the set on the right (Storyboards, production design, previs etc)
  • Set construction and “props acquire/build” – relevant to me, but in a modelling capacity. I have to model the building ‘set’ and scenery, as well as source or model props. Annotated to reflect this.
  • These elements lead in to a “final shooting script” – for me this would effectively be a finalised shot list and I imagine would not so much be a list but a refined pre-vis I then adapt to the completed set
  • This pipeline naturally largely omits arch viz features, such as texturing
Part 2: On-set shooting.
  • Again, removed crew and numerous other sections.
  • Shot Location Sound Setup – doesn’t apply as sound will be handled in post-production. It’s CG so there’s sound to capture ‘on location’ after all, except perhaps me clicking and typing away for hours…
  • ‘Grips’ don’t apply due to the nature of 3D animation and camera paths, so changed to ‘camera’ instead.
  • Shot and storyboard revisions are mentioned by Bugaj as generally only happening at this stage if something goes wrong or the director has a sudden stroke of inspiration and wants a new shot/scene that wasn’t previously in the storyboards/shot list.
  • Action: shoot footage, would simply be the act of rendering out the animation and would very much be an iterative process as with the 2D arch viz workflow I use. This stage would be analogous to the ‘final render’ of that workflow.
  • Post-production will have a more involved workflow due to the added complexity compared to 2D and differing techniques required – I’ll deal with the post-production workflow/pipeline once I’m further into the project.